
Have you always thought of starting a new hobby? If you have not tried any crafting hobby, then Cross-stitch is the perfect way to start. This hobby is easy to do and convenient.
Cross-stitch projects are less complicated compared to other crafting skills. You can do it anywhere and it does not need expensive tools. Once you learn this hobby, you will have endless patterns to channel out your creativity.
Cross-stitching is not intimidating. All you need to do is learn the basics, and you are set. First, you need to know the tools you need. Second is the basic stitches and third the fabrics to use.
The first and third factors are easy to learn. The stitches, albeit, need a bit of practice and familiarization. Once you get the knack for these stitches, you can make tons of beautiful projects in no time.
Don’t worry, the following chapters will help learn the different cross-stitch variations. These stitches are easy to do and master.
List of Contents:
- 1. Cross Stitch
- 2. Half Stitch
- 3. Quarter Stitch
- 4. Three-Quarter Stitch
- 5. Back Stitch
- 6. Spaced Cross Stitch
- 7. Double Cross Stitch
- 8. Double-sided Cross Stitch
- 9. Long Armed Cross Stitch
- 10. Hungarian Cross Stitch
- 11. Herringbone Stitch
- 12. Double Herringbone Stitch
- 13. Italian Cross Stitch
- 14. Greek Cross Stitch
- 15. Rice Stitch
1. Cross Stitch
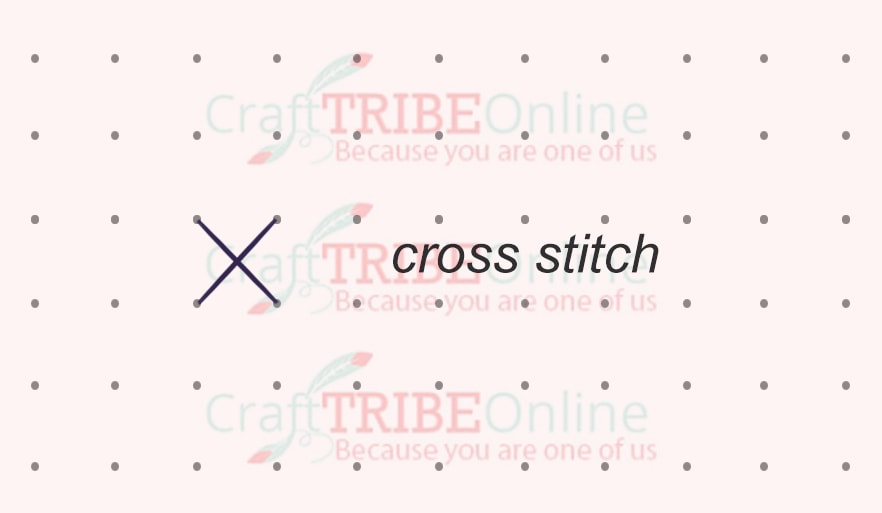
This is the basic stitch in this craft. In cross-stitching, you form your patterns using X-shaped stitches. This is where the name “cross-stitch” came from. This type of stitch is simple.
You stitch in two half-stitches over each other to create an X figure. Because of this stitch, most cross-stitch fabrics like Aida have prominent weaves. Clear warp and weft on the fabrics help you make even X stitches.
Since you are a beginner, it is advisable to use Aida with a low thread count. Fabrics with low thread counts have bigger squares or grids on the fabric. This will make stitching easier.
2. Half Stitch
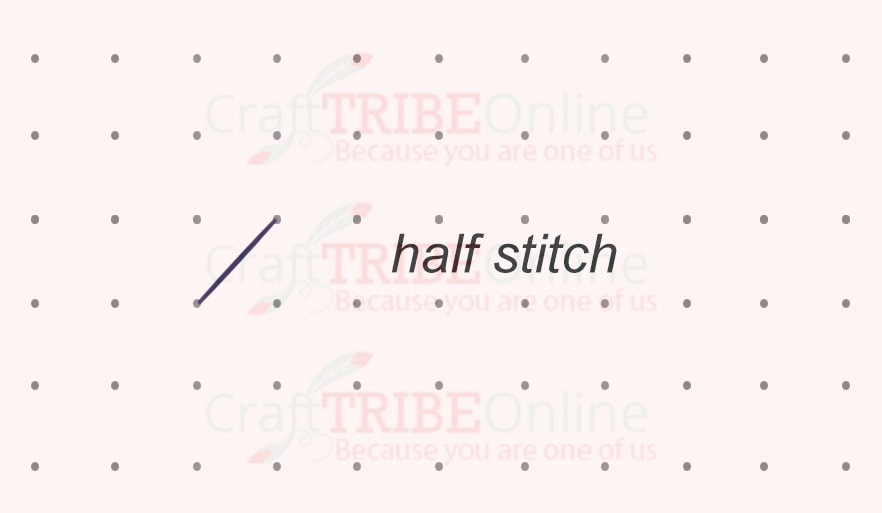
To make one X stitch, you need to make two half stitches over each other. Half stitches help create depth in your pattern. These stitches are also helpful in making outlines, corners, and shapes.
Half stitches help you make the intricate details on your project. Using these stitches allow you to make the eyes, flowers, and spirals on your patterns. These stitches are very important in cross-stitching.
3. Quarter Stitch
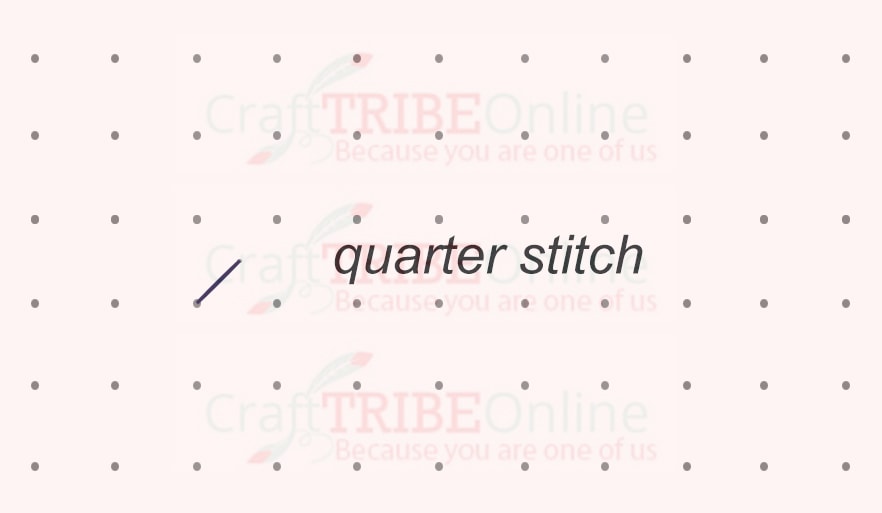
The quarter stitch looks like a half stitch, but you stitch it in the center of the fabric square. This stitch is necessary for patterns that need small stitches. It is easy to do. The challenge is how to make them even since you stitch them in the center of the square.
This takes a bit of practice to master this one. Once you get the hang of it, you will love how these add texture to your patterns.
4. Three-Quarter Stitch
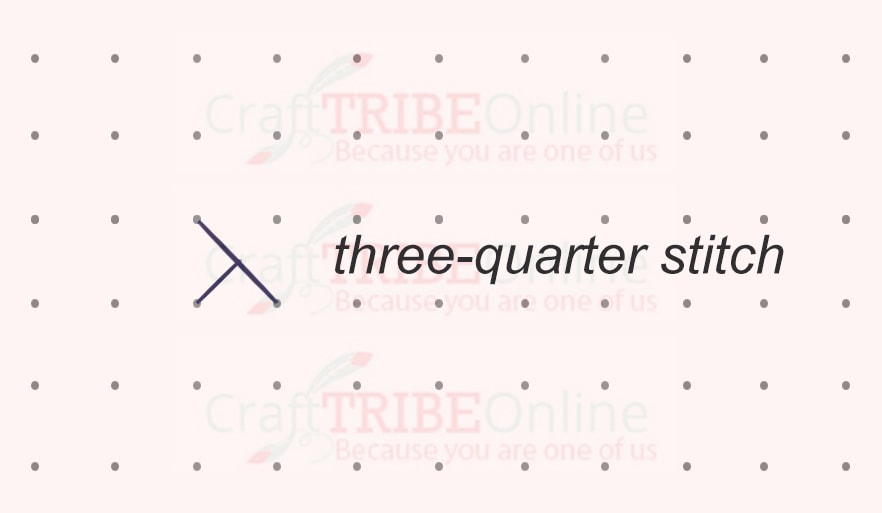
The three-quarter stitch is a combination of a half stitch and a quarter stitch. Three-quarter stitches are best for creating more details in your designs. It can be a bit complicated at first. It needs some practice, but it will help you make neat outlines and curves in your pattern.
You can see the three-quarter stitches on detailed patterns. Patterns with faces, spirals for flowers, and pumpkins often use this stitch. It adds depth to the project and ensures that the project does not look blocked.
You need to be careful when using this on linen cloth. Doing this stitch may pull the fabric out of shape. It can also distort your fabric. You may start doing this on Aida cloth. Then move on to linen once you have mastered this.
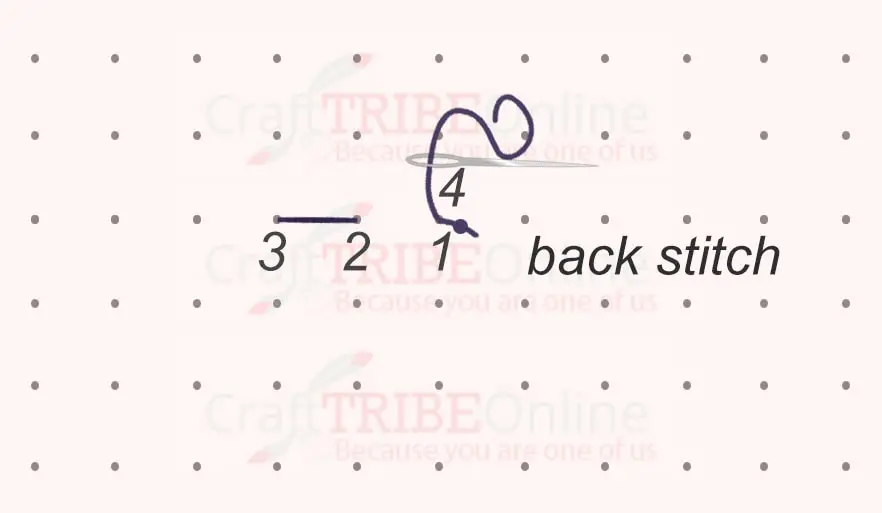
5. Back Stitch
A back stitch looks like a one half-stitch. This is advisable for cross-stitching words or letters on your pattern. Some patterns like the Blackwork use back stitch variations throughout its design.
You can use this stitch to almost all types of cross-stitch fabrics. You can even use it on cotton and denim fabrics.
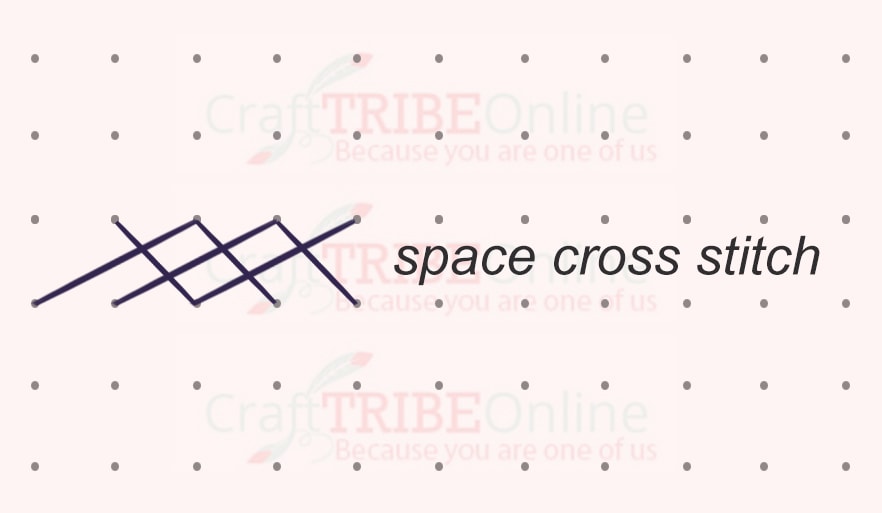
6. Spaced Cross Stitch
You do these stitches as if you are making the regular X stitches. Start from left to right. Make the half cross stitches first and then go back to make the other half- stitches
The term “spaced” means that each X stitch must have a space between. Another option is by making several single X stitches. But make sure the space between each stitch is even.
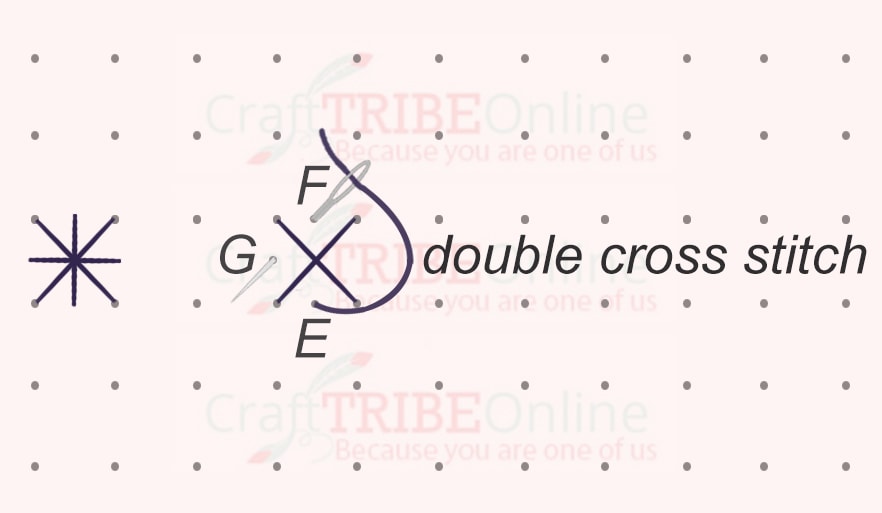
7. Double Cross Stitch
A double cross stitch has two more legs added to the regular X stitch. You make the X stitches, then add the vertical and horizontal stitches over them.
Some call this stitch as Smyrna cross-stitch.
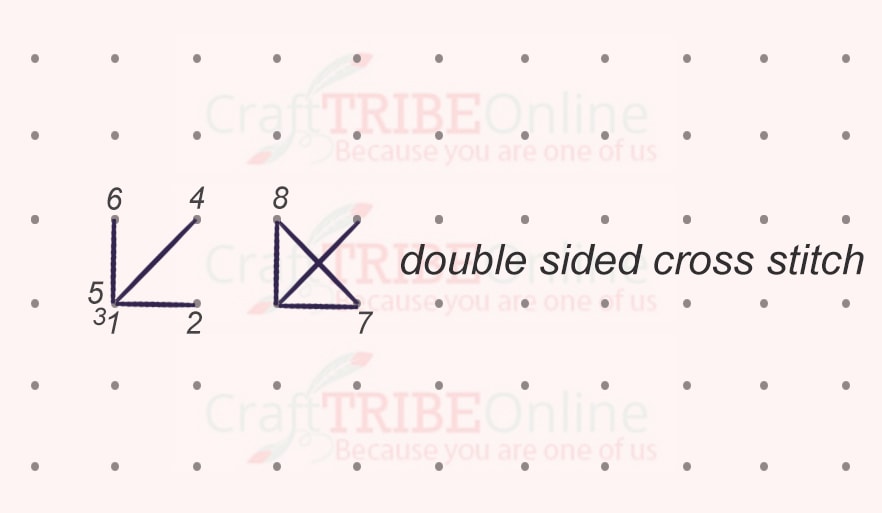
8. Double-sided Cross Stitch
This stitch looks like a regular X stitch but one of its legs has two parts. This stitch is ideal for patterns that need to be reversible or viewed on both sides. You can use this on table linens.
Some refer to Double-sided stitch as Reversible stitch. The following are the steps to do this Double-sided cross stitch.
- Start from left to right. Move four threads up and to the right on a diagonal position for the first point. Then, leave the four threads and go back across to complete the X stitches.
- Your needle needs to come out from the middle. This is to make a diagonal point going to the lower right corner. You should pass over the existing half point.
- Again, exit at the center and proceed to the second passage the same way to the first. This time you should be going from right to left.
- At this point, your third step is complete and the start of the fourth. You will notice you have the half stitch again at the end. In this step, you need to make the first leg of the X stitches in the middle of those already completed.
- Work from left to right like you did in the first step. Your first line of stitches has been completed through the fourth step.
- Your second row begins with a half stitch starting from the upper left corner and going down the middle. The needle will come up in the lower-left corner and must go down to the upper right corner.
You can do this with almost all cross-stitch fabrics. But for beginners, it is better to use fabrics with bigger weaves or grids.
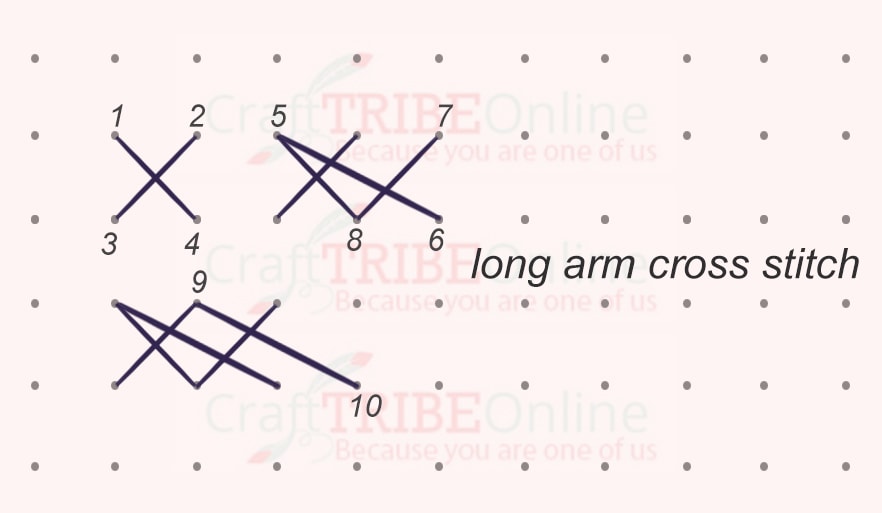
9. Long Armed Cross Stitch
The long-armed cross stitch is a kind of canvas embroidery stitch. This stitch has one arm of the cross that is longer than the other. On the reverse side, the stitches form a series of short lines set at a right angle.
These lines are at an angle to the direction of the X stitches on the other side. The Long-Armed Cross stitch also refers to Long-Legged, Twist, or Plaited Slav stitch.
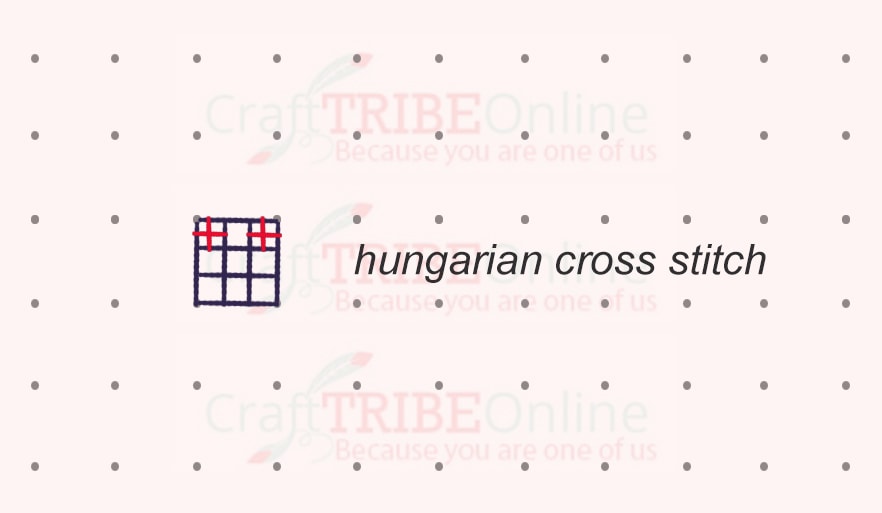
10. Hungarian Cross Stitch
This stitch involves upright cross (+) stitches made on top of the laid thread. You do this by making a grid-like pattern. Then stitch in upright cross stitches between the spaces of these grids.
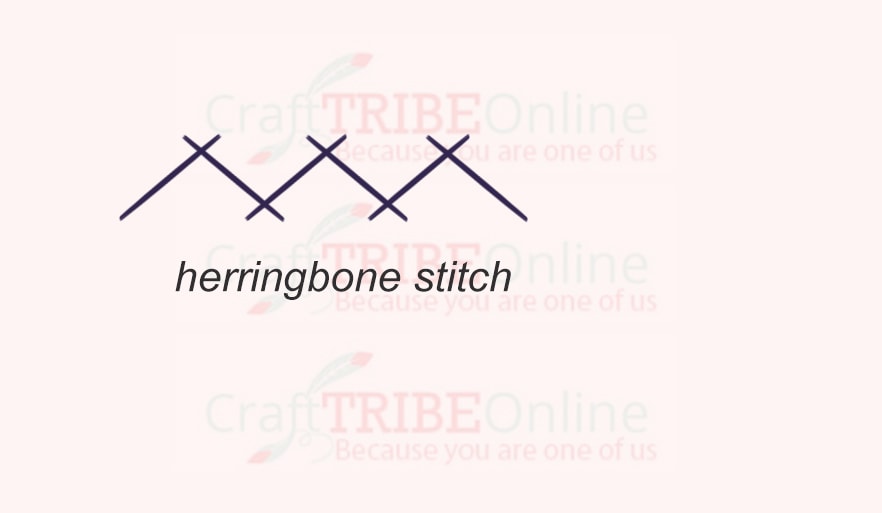
11. Herringbone Stitch
This stitch also refers to Mossoul stitch, Plaited stitch, Catch, or Witch stitch. This stitch creates beautiful and creative borders and edging to your project.
Herringbone stitch also works on some quilts. You can use this stitch on top of the seam lines of the patches. This serves as a decorative covering to the piecing stitches of your patchwork.
You can also use it in combination with other stitches. You can add running stitches, french knots, and lazy daisies with this stitch. Just make sure to add them to the gaps of the diagonal stitches.
When you work on this stitch, make parallel lines using a fabric marker or pencil. You may also count the threads in evenweave fabric to ensure even spaces on your stitches. It is easier to do this stitch on a straight line.
You can also use it on a slight curve line. You only have to ensure that the lines on the inside of the curve are closer together. Here is how you do this stitch.
Make sure you make the markings on the fabric.
Point 1 Lower left side
Point 2 Upper right side
Point 3 Upper left side (opposite point 2)
Point 4 Lower right side (extended leg opposite point 1)
Point 5 Lower right side perpendicular to point 2. Note that this will be the Point 1 of your next Herringbone stitch.
You need to work on this stitch from left to right. Bring the needle up through the fabric from the lower left side (point 1). Then, work a stitch diagonally to the upper right side (point 2).
Put the needle up again to the left side hole (point 3). This needle insertion hole is the opposite of your point 2. Then, work a stitch on a diagonal position to the lower right side (point 4).
Bring back your needle up through the left side (point 5). This becomes the new point 1 of your next Herringbone stitch.
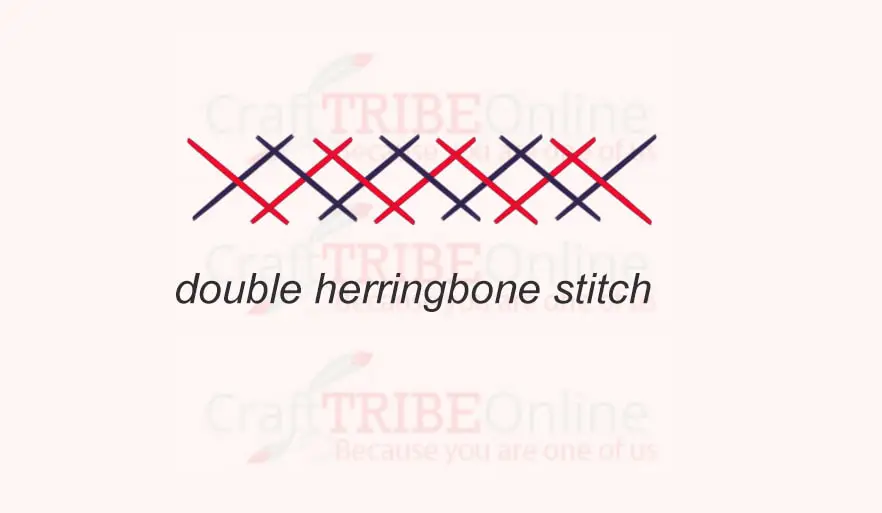
12. Double Herringbone Stitch
You can use up to 6 strands of the floss on this stitch. But for beginners, it is advisable to start with 2 strands. You may increase your floss as you progress.
- Begin this stitch by making a herringbone stitch. You may refer to the steps given earlier. Bring the needle out from point 1, put it in through point 2. Then, bring the needle back out from point 3. This is the same process you do in the Herringbone.
- Make sure points 1, 2, and 3 lie in alignment with the stitch points of the first Herringbone stitch. Put your needle above the stitch 1 then 2. You do this below the stitch of the first Herringbone row. This is a crucial step.
- Continue the process throughout until you finish the needed number of stitches.
The finished row of double Herringbone stitches should look like woven stitches.
13. Italian Cross Stitch
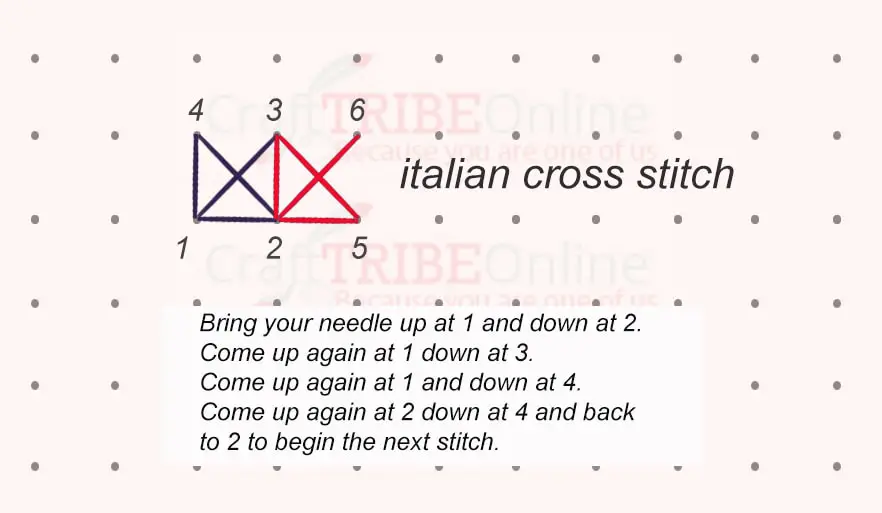
This stitch creates cross stitches (X) on the front and at the back. Then, these X stitches are within a box or square made from four straight stitches. This creates a nice stitch, especially on a reversible design.
You work on the top row by making a series of half cross stitches all the way across. Then, bring back your needle with the top cross stitches over. The bottom row has individual cross (X) stitches.
14. Greek Cross Stitch
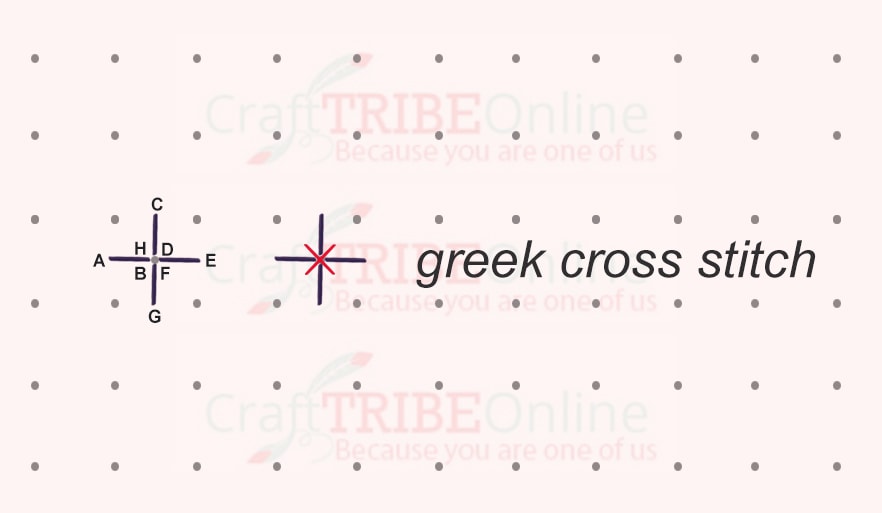
The Greek cross stitch is an upright cross (+) stitch made in four parts. Each of these upright cross stitches has an overlapping knot in the middle.
You make the Greek cross stitch by first laying the thread for the first two “cross-legs”. This will form a reverse L-shape. Then, bring your needle behind and up to the corner of the L -shape stitches and form the third “cross-leg”.
You do the same process for the fourth “cross-leg”. Once you have the fourth leg, anchor a small diagonal stitch on it. This small stitch should cross over the middle point of the upright cross stitch.
15. Rice Stitch
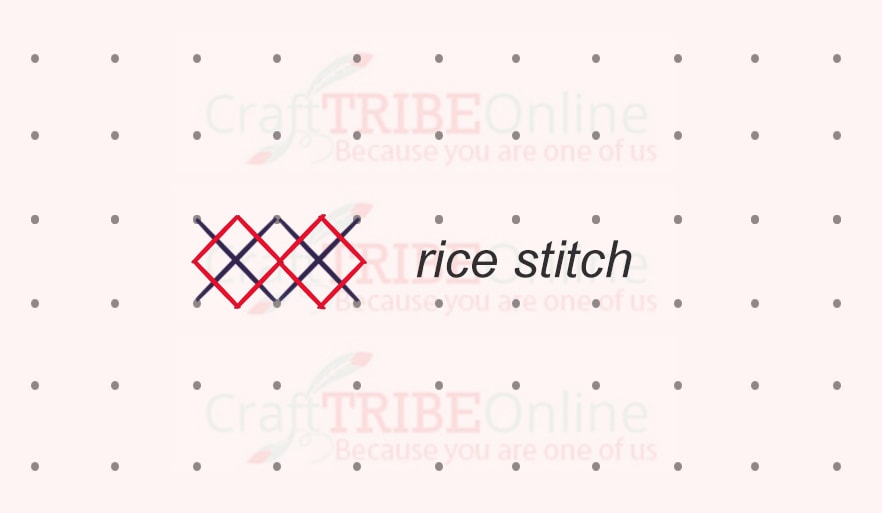
Rice stitch consists of a large cross stitch (X) with its “legs” crossed by further stitches in each corner. You can use the same thread you use for the main X stitch for these smaller stitches.
This decorative stitch also refers to the Cross Corners, Boss, or Squared-boss stitch. Some also call it as William and Mary stitch.
The rice stitch has either a basic square or rectangular cross (X) stitch or an upright cross (+) stitch. These smaller stitches create a square using backstitches over the cross-stitch. There may be one or several smaller stitches per leg of your main X stitch.
You can use varying colors for this stitch. This creates a fuller texture on your pattern
Cross-stitch is a simple and straightforward craft. Unlike other crafting hobbies, it does not take you years to master the stitches. Most of these are mere variations of the main X stitch.
You may begin with simple patterns. Try to familiarize yourself with basic stitches and pattern reading. Once you are confident with your skill, you can work on more detailed patterns.
This is one of the easiest yet fulfilling hobbies you can do. The tools are inexpensive, yet the finished projects have tons of uses. Like embroidery, you can use your cross-stitch projects for pillowcases, mats, and more.
It is never late to start a new skill. This will give you an outlet for your creativity. A new hobby will give you something to look forward to even after a tiring day at work.

Leave a Reply